
Optimize your WordPress websites with W3 Total Cache
Website owners want their sites to run as fast as possible – and the well-known W3 Total Cache plugin (W3TC) is a popular option to optimize your WordPress installations. When W3TC is properly configured, it will help your server handle greater traffic loads without jeopardizing the response time of your website.
W3TC offers lots of functionality for free, while some premium features are unlocked when the user upgrades to their Pro plan. However, the plugin lacks some documentation and it’s not always easy to understand which features must be enabled and set up.
In the remainder of this article I’ll review the main caches you can set up with W3TC in order to optimize WordPress. You’ll see how they work and the main settings you can fine-tune. I’ll also point out at some alternative solutions you might explore in some – more advanced – use cases. Let’s start!
Browser Cache
If a user’s browser caches some content, the next request for the same resource won’t even hit the network. It’ll be served locally from memory or disk, so this has the greatest savings for everyone:
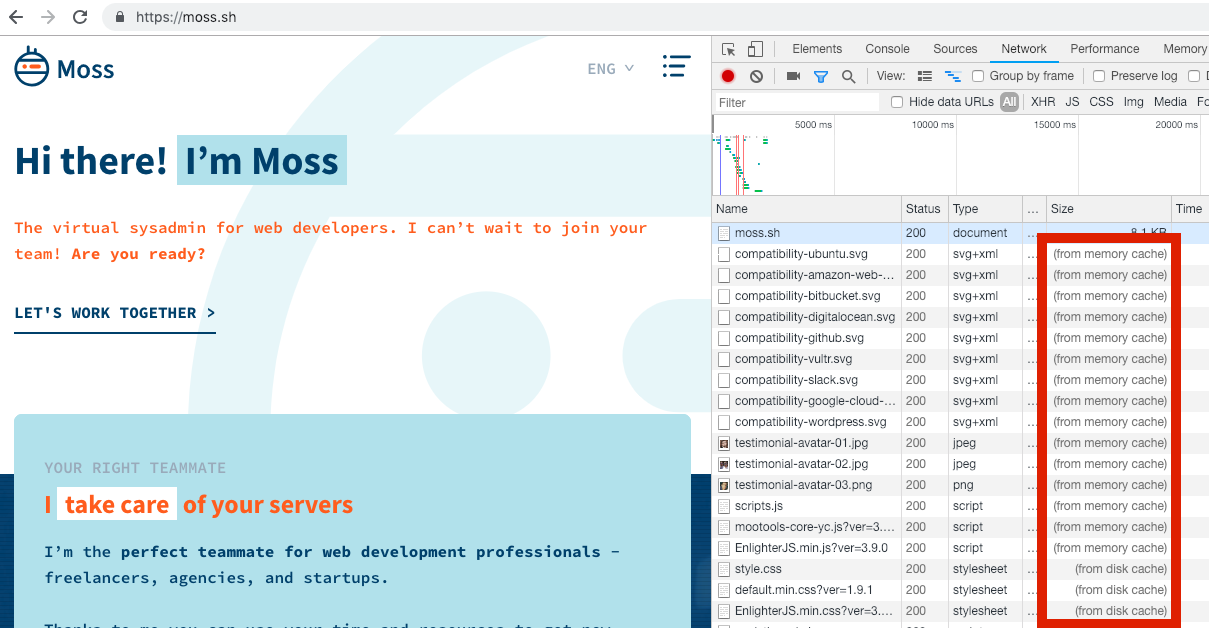
In order to achieve this, web servers send some headers back in HTTP responses to tell receivers (browsers, proxies, etc) if/how/for how long they can cache the content. HTTP 1.1 introduced the Cache-Control: header to handle this. Let’s see some common use cases.
E.g. some websites have versioned assets whose names always change as their content changes (e.g. scripts-7457f3.js, where “7457f3” is a checksum of the content). Alternatively, developers may add a query string to distinguish among versions (e.g. ?ver=1.2). The latter approach is widespread among plugins and themes WordPress developers. In these cases, the server can instruct the client to cache an asset for a long time – e.g. one year – by sending back the header Cache-Control: max-age=31536000. The value in max-age specifies the number of seconds the content can be cached before being considered stale.
Before HTTP 1.1, the expiration date had to be given as an absolute timestamp in the Expires: header, e.g. Expires: Wed, 22 Jan 2020 14:18:26 GMT. While you can stick with just Cache-Control:, you can safely include Expires: too since the former will take precedence at the client.
On the other hand, non-static assets cannot follow such policy. In this case we should give a much shorter expiration date (max-age=0 is a perfectly fine value in many cases, but don’t use it if you want Cloudflare to cache your website). You should also put a mechanism in place to let the cache validate if its local copy is still valid without having to download the file again – maybe it hasn’t changed after all. Two (non-exclusive) options:
- Server returns
Last-Modified:header with a timestamp, so the client may includeIf-Modified-Since:header in future requests. In case the file hasn’t changed since the given date, the server replies with an HTTP304 Not Modifiedresponse. - Server returns
ETag:header with a checksum of the resource’s content, so the client may includeIf-None-Match:header in future requests. In case the file’s checksum is the same as the one given, the server replies with an HTTP304 Not Modifiedresponse.
Finally, if you want intermediate proxies (say your CDN) to cache your files, you should also add the public attribute to Cache-Control: headers.
Ok, now we can implement our browser caching policy in W3TC. Make sure it’s enabled in the “General Settings” section of W3TC:

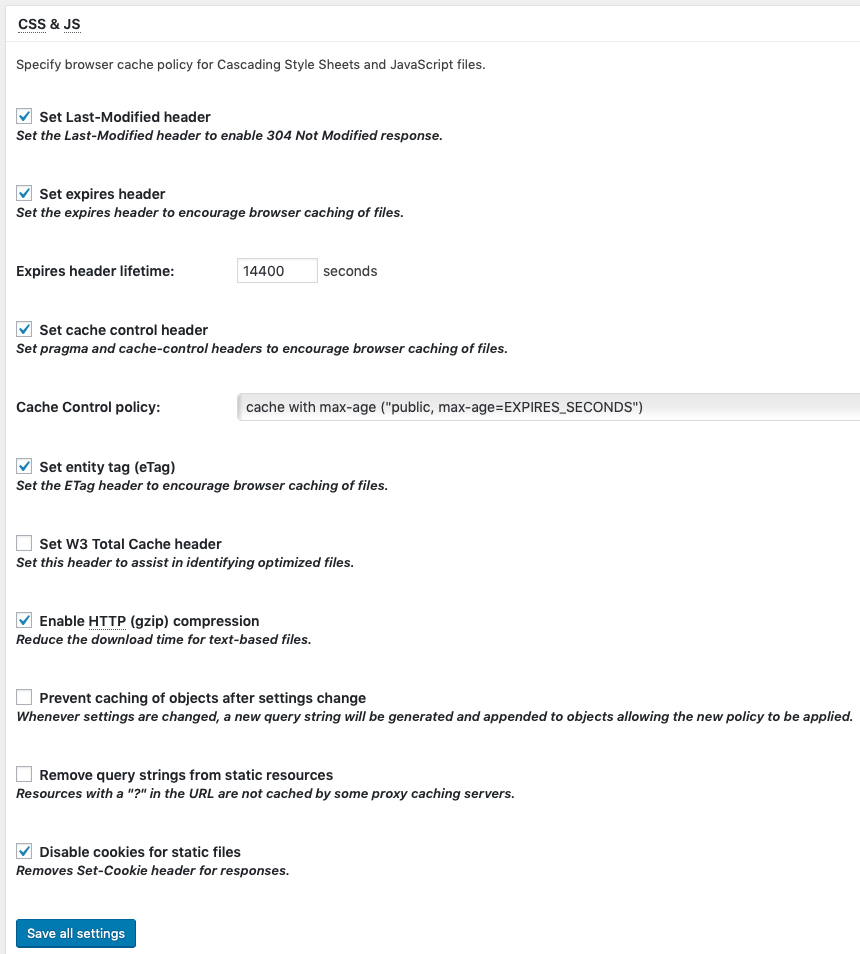
In the “Browser Cache” section we can see quite a few settings in the General card, and we can fine-tune them for CSS & JS, HTML & XML, and Media & Other Files. In the case of a company blog like ours, we can try to leverage browser caching to improve the overall experience of our visitors. Since we don’t update images using the same file name, we can safely let them be cached for one year. Our static assets (theme’s stylesheets and scripts) aren’t versioned as of this writing, so we set up a max age of just four hours (might be one year otherwise). On the other hand, we rarely edit a blog post. But if we do, we want our visitors to retrieve the updated post in a relatively short amount of time – one hour as of this writing. And finally, we want Cloudflare to cache our assets, so let’s not prevent that. This is the resulting configuration in W3TC:
- Set Last-Modified header
- Set Expires header
- Lifetime for CSS & JS = 14400 seconds (four hours)
- Lifetime for HTML & XML = 3600 seconds (one hour)
- Lifetime for Media & Other Files = 31536000 seconds (one year)
- Set cache control header: “cache with max-age (public, max-age)”
- Set entity tag (ETag)
- Enable HTTP (gzip) compression
- Don’t set cookies for static files
Content Delivery Network
Your CDN places your content closer to your visitors, hence reducing network latency and overall page load. We recommend Cloudflare, but any other CDN can do a great job.
Cloudflare is a so-called pull CDN – i.e. you don’t have to upload your assets to their servers. Cloudflare caches your website’s resources as your visitors ask for them. Hence, you don’t really need to set up anything in W3TC – you can leave the default config as-is.
That said, you might want to enable the Cloudflare extension in W3TC. You can provide your Cloudflare credentials and such extension will let you customize some CDN settings. The good thing about the extension is that W3TC can purge your CDN when you update your content. While this is fairly convenient, we don’t personally do that because we don’t cache HTML at Cloudflare and we rarely update our static assets. When we do, we just log into our Cloudflare’s account and purge the caches right there. In this way, we don’t have to provide our WordPress installation with our Cloudflare credentials. However, if you cache HTML at Cloudflare, you update your content on a regular basis, and your website is well-protected, you should consider enabling this extension.

Three more things to consider if you’re using Cloudflare:
- By default Cloudflare overwrites the expiration date your origin server sets in
Cache-Control:andExpires:headers. In order to have a single source of truth, head to “Caching -> Browser Cache Expiration” in Cloudflare and set the value “Respect Existing Headers”.

- By default Cloudflare doesn’t cache HTML files. Some people draw wrong conclusions about the performance of their sites behind Cloudflare because they’re not aware of this. If you’re sure you want Cloudflare to cache your HTML, then follow the steps in this article.
- By default Cloudflare doesn’t cache responses with a cookie or if the
Cache-Control:header is set toprivate,no-store,no-cache, ormax-age=0. And this is great, since it gives us ways to make sure that non-cacheable content will be ignored by our CDN.
On the other hand, if you use a push CDN – i.e. you upload your assets to their servers – you can explore the different settings that W3TC offers to set it up. A detailed review of these ones is out of the scope of this post, but you may refer to W3TC’s CDN wiki.
Page Cache
The Page Cache is likely the feature that will have the greatest savings on your server’s resources. Head to W3TC’s “General Settings” and choose the “Disk: Enhanced” method.

This method works as follows. Whenever WordPress returns an HTML page upon a request, W3TC saves the response in a file and adds a redirection rule in the web server. Such redirection makes the web server return the content of the cached file the next time the the same page is requested.
Please read again the former paragraph, since there are some misunderstandings out there on this regard. Some people think that they must use other (more complex) caching technologies because WordPress cache plugins perform poorly. They say so because they (incorrectly) think that every request involves spawning a PHP process and running plugin code that returns the cached document. As we’ve just seen, this is just not true – the web server itself returns the cached document if you’re using the “Disk: Enhanced” Page Cache of W3TC. And, in most cases, this is really fast.
The default web server stack for WordPress in Moss is Nginx as a reverse proxy in front of Apache. This means that W3TC adds their redirection rules within the root .htaccess file of your site, so that Apache returns the cached file as soon as it’s requested.
But Moss also lets you choose Nginx as a standalone server for your WordPress sites. Usually you cannot make W3TC’s “Disk: Enhanced” Page Cache work with Nginx in a shared environment, but this is not the case with Moss and your VPS/Cloud server 😎. W3TC detects it’s running behind Nginx and creates an nginx.conf file with the appropriate redirections. In order to apply them, follow these steps [only for Moss users]:
- Log into your server via SSH as user
moss - Run
sudo su - Run
cat /home/<user-name>/sites/<site-name>/public/nginx.conf > /etc/openresty/server_params.<site-name>(use your actualuser-nameandsite-name) - Run
rm /home/<user-name>/sites/<site-name>/public/nginx.conf(use your actualuser-nameandsite-name) - Provision your site from Moss
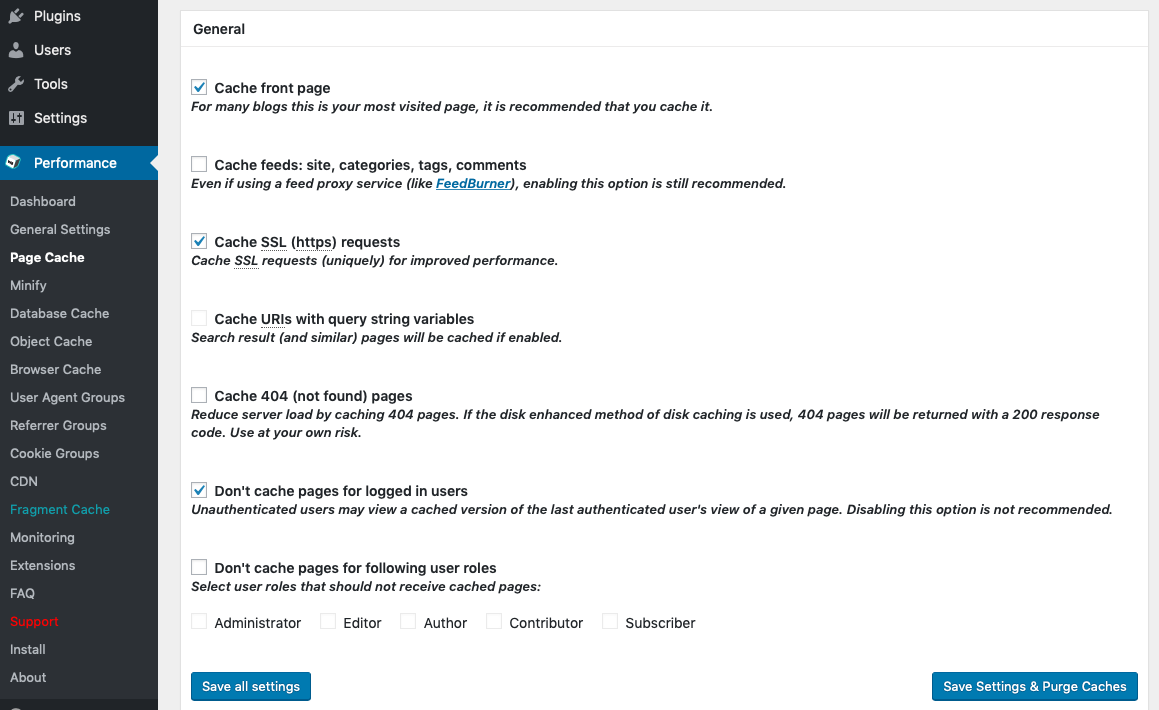
Now we know how to enable this cache and how it works, let’s head to the “Page Cache” settings in W3TC and customize its behavior. You can find the most relevant configs in the General card, so make sure you take a moment to think about them:
- Usually, you want to cache your front page since it’s the most visited one in most cases.
- You usually want to cache HTTPS requests too. In fact, you should always serve your website via HTTPS [Moss automatically redirects HTTP to HTTPS, by the way].
- If you’re running a company blog like we do, you won’t want to cache pages for logged-in users. However, there are use cases in which this is important to improve the user experience in your website. See how to cache content for logged-in users in the section below.
Once the basics are clear, you can keep customizing your Page Cache in W3TC. There are lots of different settings – too many to discuss them all here. However, here you can find a list of things you should take a look into:
- Purge Policy. Indicate the pages and feeds to purge when posts are created, edited, or comments posted. This is very dependent on the nature of your website, but also easy to determine by yourself (e.g. we don’t purge the front page because it doesn’t show any blog post, but we do purge the posts page and blog feed).
- Non-cacheable content. If you have content that must not be cached, you have to tell W3TC about it – you can exclude them by file name, category, tag, author, and custom field. Otherwise, don’t worry about this.
- In some advanced use cases, you might consider to preload the cache proactively. Most likely not required, but it could help in your case.
If you don’t really know what these settings actually mean, you can better leave their default values.
Object Cache
WordPress provides an Object Cache API to let developers store the results of complex (i.e. time consuming) operations – usually database queries. By enabling the Object Cache in W3TC, you ensure that such results will be persisted to be reused across requests.
Whether you can benefit or not from this kind of cache is really dependent on the nature of your website and the software (plugins and themes) it runs. In general, very dynamic sites like online communities can get higher savings when enabling this cache. Mostly static sites like company pages or personal blogs won’t experience a significant speedup with the Object Cache. However, your mileage may vary – you can experiment with your site to check whether this cache is worthwhile in your case.
To enable the Object Cache, head to the “General Settings” of W3TC. You must choose a storage backend for the cache. Whenever possible, choose Memcached or Redis as the Object Cache Method, since they’ll store the objects in memory – faster access than the Disk backend [you can install either Memcached or Redis with Moss in one click].

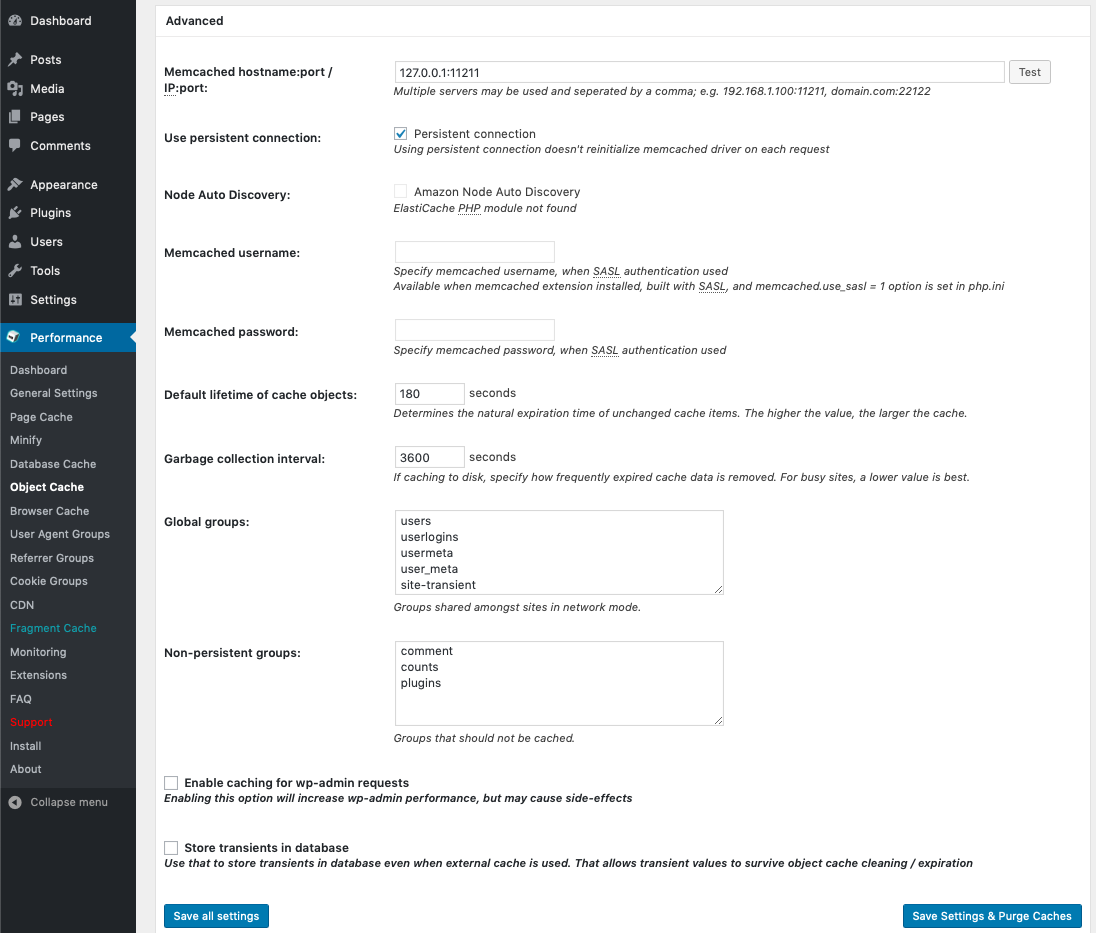
Now head to the “Object Cache” section to fine-tune your setup.
- If your backend is Memcached or Redis, you must provide the hostname:port WordPress will use to connect to the service.
- I’ve never had to enable caching for wp-admin requests, but your use case might differ.
- I don’t usually store transients in the database, since purging them from the cache has never caused a performance issue in the websites I’ve seen.
- The default values of the remaining settings are likely ok for your website, but review them first.
Other topics
- You’ll see there’s also a Database Cache in W3TC. Leave it disabled: If any, use the Object Cache instead.
- In addition to caching, W3TC provides features like minification – i.e. it can reduce the size of your assets to minimize their download time. We encourage you to minify your resources, and W3TC is one of the means you can employ to achieve it. But if you’re using Cloudflare, don’t minify in both Cloudflare and W3TC – choose just one of them and disable minification at the other.
- In some websites, e.g. membership sites, most users log into your website and see their specific content. In many cases, the Browser Cache and the Object Cache are enough. But if you really need to cache per-user pages, then you might consider other plugins like WP Rocket.
- If you need to get the most out of your e-commerce website, you should consider more advanced setups. In an e-commerce you usually have both cacheable (e.g. product descriptions) and non-cacheable (e.g. the shopping cart) content in the same page. You can edit your template to add marks that tell W3TC not to cache a given section of the page. Then enable W3TC’s Fragment Cache and set it up – note that this isn’t included in the free version of W3TC, you need to upgrade. Alternatively, if you have an e-commerce site with serious revenue, you might also consider Varnish as your default caching solution. It supports Edge Side Includes (ESI) that provide the functionality we’ve just described.
- Caching is a must but not the only way to improve the performance of your WordPress site. If you have fewer and higher-quality plugins, they could make a difference in the response time. You can also enhance the underlying infrastructure of your website (vertical scaling, i.e. better servers, disks, and networks) or spread the load among multiple servers (horizontal scaling, the setup is way more complex in this case) to achieve higher levels of performance and scalability.
Conclusion
Providing your users with the best possible experience should be your #1 concern. But it’s hard to achieve that if your website takes ages to load. In order to prevent that, a good caching policy is one of the first things you must consider to improve the response time of your website. In addition, serving cached resources is “cheaper” in terms of server resources, so you can support more users/visitors with the same hardware.
There are lots of caching alternatives, but if you’re running WordPress sites, a good cache plugin is the best way to proceed in many cases. If you choose to use W3 Total Cache – a very popular free option – don’t forget to enable and properly set up the Browser Cache and the Page Cache in “Disk: Enhanced” mode. Also use a CDN whenever possible, since it’ll further minimize the load on your servers. In case you use Cloudflare, take a look to the various remarks I’ve reviewed in this article. Finally, remember that no size fits all: Depending on your site’s requirements, you might need a different plugin or a completely alternative caching solution.
If you enjoyed reading this, please share it and subscribe to our blog so that we send you an email as we post new content. And in case you haven’t tried Moss yet, sign up now and check how it can help you manage your servers and websites!